


Basically, the installation of our underfloor heating is very simple. On the following pages you will find all the information you need to calculate the required material, to install the heating and to start up the system.
If you have any questions, our team will be happy to help you with advice and practical assistance.
Installation instructions-
Basically the installation of the floorino heating foil is very easy. Based on the instructions described here, you should have no problems with your new underfloor heating system during installation and connection.
In case of problems, please read these instructions first. However, experience shows that questions may still arise, so in such a case we would ask you to contact the floorino service team immediately.
Foreword
- Multiple tests during and after the production process ensure that each heating foil sent out is in perfect condition.
- No liability can be accepted for consequential damage caused by incorrect installation or by third parties. Therefore please follow the instructions carefully.
- Outdoor areas or wet rooms are completely unsuitable.
- No liability can be accepted for improper use.
- The floorino heating foil was specially developed for a floating floor covering such as parquet or laminate. Other applications require more complex installation, which is also discussed below.
- Never try out the foil in rolled up condition. This can cause damage for which no liability is accepted.
- The floorino heating foil was developed as a surface heating for the floor. Other applications such as wall or ceiling heating are at your own risk.
- There must be sufficient thermal insulation of the substrate. For details, please refer to the current heat insulation regulations.
1. surface preparation
Make sure that the surface is level. Before installation, the subfloor, e.g. screed, must be cleaned of coarse dirt and dust. Pointed objects that could damage the film must be removed. Tiles, linoleum or an old carpet are also suitable as subfloor.
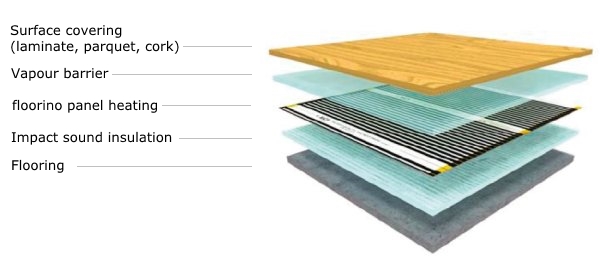
2. lay out footfall sound insulation
First measure your floor carefully and lay out the insulation boards in the room for a test. Then draw the cut edges with a pencil on the insulation boards that need cutting. Then cut the boards with a cutter or sharp knife/scissors.
Start laying the impact sound insulation boards on a wall and fix them with some adhesive/adhesive tape. Now attach the next insulation mat again with some glue on the underside and fix it flush with the previous one. Proceed accordingly for the rest of the installation work.
It is recommended to use an impact sound insulation of 4-5mm thickness or more, which is suitable for underfloor heating.
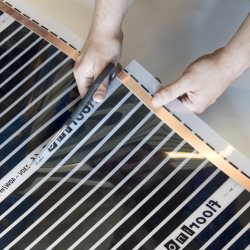
3. Lay out the floorino heating foil
After the comprehensive installation of the footfall sound insulation, you can start laying the floorino heating sheets. You can find out how much of this is required and how long the individual sections should be here or in the section on material consumption.
Always start at the longest wall of the room to minimise the subsequent connection effort of cables etc.
The side of the floorino heating foil with the copper conductors must be laid towards the floor. Unroll the foil along the entire length of the room. Observe the recommended minimum distance of 10cm from the wall. It is best to keep a distance of approx. 10 to 20cm from the wall. This is to avoid heat accumulation and there is often furniture etc. at the edges anyway.
If the floorino heating tracks need to be shortened, please refer to the corresponding instructions further down in the text.
Now you can lay the second floorino heating strip loosely (floating) next to the previous one. This should have an approximate distance of 2 to 3 cm to the first heating foil. Please note that the foils must never overlap.
Proceed accordingly for the rest of the installation work wherever floorino heating sheets are to be laid.
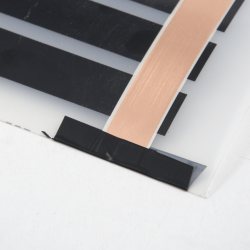
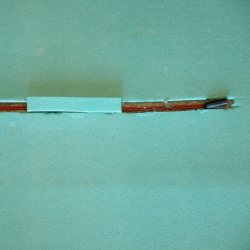
4. Shorten floorino heating foil
Despite prior planning, it can sometimes be necessary to shorten a floorino heating foil. This can be done every 20cm at the appropriate points (marked with a scissors symbol). Accordingly, the heating foil can be adapted to almost any room.
If such a cutting to length is necessary, please proceed as follows:
- Only make cuts at the points marked with scissors.
- Avoid cutting into the black heating fields.
- The resulting edges, especially on the copper wire, must be sealed with an insulating adhesive tape
5. thermostat location planning/ cable connections
Important: Laymen should not carry out any work on a 230V connection. Improper handling can result in serious injuries. In case of doubt, a specialist should always be commissioned. So please do not take any unnecessary risk.
Plan the later location of the thermostat. This is recommended on a narrow side of the heating surface or room. The reason for this is that the system will be easier to connect later. In this way, the cable distances are considerably shorter, the accessories required are lower, and usually drastically fewer cable connections are required.
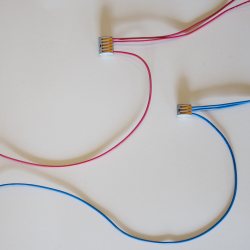
For each floorino heating track, cut one blue and one red cable in the length required for the path (usually via the skirting boards) to the thermostat. Slide the stripped end of each cable into the metal terminals and press the joint firmly with pliers. The other side of the connection terminals is again clamped from the front side into the end of the copper tracks of the floorino heating tracks. It is recommended to do this with crimping pliers. For later orientation a red and a blue cable should be used for each heating track. The length of each cable should correspond to the distance to the planned thermostat location. All transitions between heating foil, metal terminal and cable are taped from below and from above with a 5x5cm thick piece of butyl tape. This serves as insulation as well as punctual and mechanical load capacity.
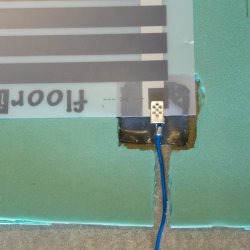
Important: The metal terminals must "disappear" flush with the surface. Therefore, the corresponding recess must be cut out in the impact sound. To ensure that no damage occurs, line the hole with suitable soft material if necessary. This can be the impact sound insulation or a piece of carpet.
All cables coming from the floorino heating foils are separated according to colour and brought together in the plastic quick connectors (Wago clamps) (electrical parallel connection) and fed directly into the thermostat as a single collector pipe (one red and one blue cable). The merging should therefore take place near the controller (usually vertically below). Often an extra surface-mounted or flush-mounted box is installed for these "connection bundles" (depending on the number of heating tracks, approximately the size of a cigarette box is required).

A cable protection tube is now fitted between the thermostat and the junction box (also either surface-mounted or flush-mounted). It does not need to be much larger in diameter than a ballpoint pen, as only a red, a blue and the temperature sensor cable need to be routed in it.
The next step is to create the path for the temperature sensor. The sensor cable runs from the thermostat in the cable protection tube vertically downwards to the floor and from there at a right angle into the room.
The sensor head of the sensor cable must lie at least 10-15cm directly below the heated surface.
A cable duct (maximum thickness of ballpoint pen) is recommended for the path on the floor, for which a corresponding strip is cut out of the impact sound. If this recess is not sufficient for the pipe to disappear completely, a small piece may have to be milled or chiselled out of the underlying substrate (screed, etc.).
Make sure that the pipe, but also the metal connection clamps are positioned deep enough so that they do not affect the top layer.
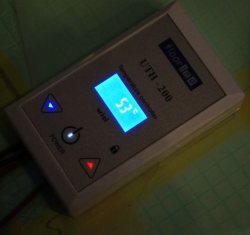
Now you can connect the temperature sensor, the two cables to the heating foils and the house current to the thermostat according to the circuit diagram of your floorino thermostat. You can find the corresponding circuit diagram here or in the "Download" section.
You can then measure all the foils using the controller. Please refer to the manual and the table of effective resistance for the corresponding values and instructions on how to perform this procedure.
These can also be found in the "Documents for download" section, depending on which floorino thermostat you have selected. Minor deviations from/to +/-10% in the effective resistance are normal.
A test run should be carried out before laying the floor covering. For this, switch the controller to maximum power. You should hear a click and a noticeable effect for a short time.
It takes a little while until the foil warms up. Please note that the foil has been specially developed to regulate the temperature of laminate and parquet flooring and works with infrared technology. Accordingly, the foil will only heat up slightly, the subsequent temperature inside the room is not directly related to the surface temperature of the foil. The only important thing is that it heats up only slightly.
6. lay out vapour barrier film
After you have laid the floorino heating foil, the vapour barrier foil must be laid out. It is essential that this is done over the entire surface and overlapping to ensure a good downward seal. The vapour barrier film should be laid directly up to the walls. In any case, the surface of the floorino heating foil must be covered. The vapour barrier film is taped/sealed to the impact sound insulation and to each other with vapour barrier tape.
7. installation and suitability of the surface covering
If all results are satisfactory, please disconnect the system from the mains again to ensure that none of the foils are under tension while the top layer is being laid.
Important:
- The surface covering must be laid and maintained according to the instructions of the respective manufacturer.
- The top covering must be suitable for underfloor heating. Here a thermal resistance of:
- for laminate min. 0.08 Lambda
- for parquet min. 0.14 Lambda
- for cork min. 0.23 Lambda
However, pay particular attention to the area where the foil connections are, so that nothing can be trapped or pressed here.
Do not screw or nail through the foil, especially not through the copper conductors or heating sections. If it is absolutely necessary to fix the top covering through the foil, it is essential to ensure that neither the connections nor the heating surfaces or the copper conductors are damaged. In such a case we cannot accept any liability for any product and/or consequential damage.
8. handling and suitability of linoleum/PVC/carpet/cork
Basically, linoleum, PVC, carpet or cork are not suitable as top coverings, as they are too soft and too thin to protect the heating foil from excessive punctual stress. Even a falling knife or screwdriver can damage the foil when piercing the top covering.
However, there is still a possibility to use the floorino heating foil under these conditions. Suitable MDF boards with a thickness of approx. 2 to 3 mm must be laid between the top covering and the vapour barrier film. The resulting additional protection ensures that the foil cannot be damaged in everyday use.
Frequently asked questions
In the product description and on the basis of the installation instructions, we try to answer or solve as many questions and problems as possible. However, experience shows that ambiguities always arise, which is why a few of the most frequently asked questions are listed below.
Can I shorten the floorino heating foil?
Yes, but the heating foil may only be cut between the black heating surfaces. Never cut through one of these areas. Afterwards, the exposed edges must be sealed again with insulating tape.
Which laminate / parquet is suitable?
All types that have an EU CE mark and are generally suitable for underfloor heating.
Which footfall sound insulation is suitable?
An impact sound thickness of 4-5mm is recommended. Furthermore, all types are suitable which have an EU CE mark and are generally suitable for underfloor heating.
Can anything happen when you have drilled into the ground?
Usually this is harmless as long as the damaged area is isolated. But be careful: If the copper strip has become defective or damaged, the foil is no longer usable and must be disposed of. However, you can shorten the foil from the damaged area and from then on of course use it again.
Is the floorino heating foil suitable for bathrooms and wet rooms?
No, even if the subfloor in a bathroom consists of laminate, for example, the floorino heating foil must not be laid underneath it. The danger to the electrical system in a constantly damp environment would simply be too great and therefore the use of this type of heating foil is not permitted by law.
Can the floorino heating foil be laid under carpets, PVC/linoleum or cork?
Basically, carpets, PVC/linoleum or cork are too soft to ensure that the topmost layers of floorino are not damaged too much after years of use.
Movements on the surface will cause the heating foil and the carpet or PVC or cork to rub against each other to a small extent, which can cause wear of the foil.
In addition, high point loads or falling objects such as a knife can damage the foil. Here there is still a possibility to not have to do without effective heating with floorino. How exactly you should proceed in such a case during planning and installation can be found here or in the section installation instructions.
Plan material consumption
The number of m² required naturally depends on the size of the room and the premises. In the following, we will try to calculate this using an example.
Let us assume that the floorino underfloor heating system is to be installed in a room with total dimensions of 5m x 3m. It is then recommended to plan 4.5m long strips of floorino heating foil corresponding to the longest side of the room.
The missing 0.5m should be kept as wall distance (25cm on each side of the room). The narrow side of the room is covered with the width of the heating strips. This is 0.5m, i.e. with the assumed 3m room width, 5 strips of floorino should be planned. Here too, a total distance of 0.5m from the wall, i.e. 25cm on each side, must be taken into account.
Further examples
- With a room length of 5m and a room width of 4m, 7 lanes of 4.5 running m each are recommended.
- For a room length of 7.5m and a room width of 3m, 5 sheets of 7.0 running m are recommended.
- For a room length of 2.5m and a room width of 5m, 4 sheets per 4.5 linear metres are recommended.
Note: The foil can be cut to length every 20cm, which can be taken into account when planning. The following is also an example:
With a room length of 3.6 m and a room width of 4.2 m, it is recommended to use 7 sheets per 3.2 running m.
Calculation
The longer side (variable x) minus 0.5 (rounded to the nearest 0.2m) corresponds to the length of the heating tracks.
Ex.1: (4.2 - 0.5) = 3.7 → rounded to 3.8
Ex.1: (5.3 - 0.5) = 4.8 → rounded to 4.8
The shorter side (variable y) minus 0.5 (rounded to the nearest 0.5m) corresponds to the number of heating tracks.
Output
It is recommended to use y strips per x length, or in total (x * y) / 2 square meters of heating foil.
It should be noted that the above calculation examples are based on a full-surface design of the room. However, this is not absolutely necessary depending on the environment. Nevertheless it is recommended to cover at least 70% of the floor space.
Otherwise it is possible that the heating does not reach the volume of the room or its reaction speed is considerably inhibited. In order to ensure full effectiveness, however, it is best to equip the entire room with floorino.